Monday 20 August 2012

Beware of the Microsoft Account!

The introduction of the Microsoft Account as an identification method on Windows 8 is great, it enables several scenarios in a seamless way and it makes life easy for users.

But there’s a downside over there: some services won’t work as the required impersonation (there’s always going to be a “shadow user” of your Microsoft Accounton your pc) is not allowed to be done from a security perspective.

This leads to problems in particular with Visual Studio Team Lab Management, where a massive usage of the impersonation is done in order to use the Lab features.

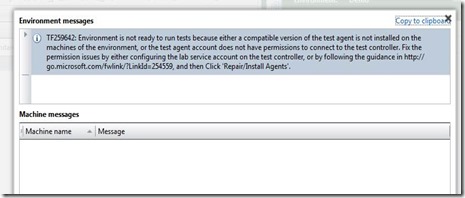
In my case, I verified tons of troubles when, with a Standard Environment made of workgroup machines. In this case, the installation of the required agents inside the machines always failed, with no particular reason (and without a real error!):

clip_image002

Obviously I don’t want to manually install anything, so the solution is to use another Windows Account (warning: a local Windows Account) as the Lab Service Account:

image

That’s it Smile

Friday 17 August 2012

Tailor-made Visual Studio 2012 installations (aka unattended, the new way)

Up to Visual Studio 2010 the unattended installation was made up of many steps, making a journey into a .ini file…

With Visual Studio 2012, the new experience is pretty faster, cleaner and easier.

The first thing to do is to create a Network Image, to be used into the company to deploy Visual Studio 2012. You have to create a X:/IDEinstall folder.

Then the only needed step is to customize the AdminDeployment.xml file! I won’t go deep dive on the schema as the MSDN documentation is self-explanative, but it can be summarized as it: you can choose which component to install in a Yes|No binary choice.

Once the AdminDeployment.xml file is customized as you want, you just have to grant the share all the required permissions and the users are automatically going to install Visual Studio with the defined settings.

Otherwise a silent installation is possible using the following command line statement:

\\ServerName\IDEinstall\vs_Product.exe /adminfile AdminDeployment.xml /quiet /norestart

This statement is also the way of managing Visual Studio installations, both quiet and interactive. Again, everything relies on the AdminDeployment.xml file.

Friday 3 August 2012

Visual SourceSafe to Team Foundation Server step by step

As I tweeted some weeks ago, the Visual SourceSafe 2005 support expired July 10th, 2012. So it is no more a supported solution from Microsoft.

If you have some Visual SourceSafe still lying around your datacentre, here’s how to kill them with no pain Smile

First of all: you’re going to need the VSSConverter, a fantastic tool contained in the Visual Studio installation, under

<drive>:\Program Files\Microsoft Visual Studio 10.0\Common7\IDE

Beware: with Team Foundation Server 2012 there’s going to be a new tool to perform migrations. I’m going to post something on the new tool as soon as I can, but for now this is the only way to migrate it. Moreover, if you won’t have Team Foundation Server 2012, you have not that much possibilities…Smile

I strongly suggest you to copy the VSSConverter and its related files inside a folder, like <drive>:\Migration, in order to keep everything simple.

Then you have to create two XML files: one is for the Analysis, and the other for the Migration. I won’t go into details, everything you need about those files are into the MSDN but…I provide you two samples Smile here’s one for the Analysis, and here’s the other for the Migration.

To analyze the Visual SourceSafe database, use the following command (from an elevated command prompt):

vssconverter.exe analyze analysissettings.xml

It analyzes the Visual SourceSafe database (or part of it), and provides us a report, to understand whether there are errors, and a UserMap.xml file. Inside of it we can find the Visual SourceSafe users to map to the correct Active Directory user in Team Foundation Server.

What does it happen if I don’t map a user (for various reasons)? Well…despite it’s strongly suggested to do so, the difference in behavior is the following:

With:
Changeset 4121 – Committed by DOMAIN\UserWhoDidIt – Comment

Without:
Changeset 4121 – Committed by DOMAIN\MigrationUser – Comment (Committed by UserWhoDidIt)

After finalizing the user mapping, we use the following command to migrate:

vssconverter.exe migrate migrationsettings.xml

And the migration takes place Smile that’s it!